We used to roast our turkey the old-fashioned way: stuffed it, trussed it and roasted the whole bird in a 325 degree F oven. That was ok, but by the time the thighs hit 170 degrees and the juices ran clear from inside the thighs, the breast was a little dry. The breast really only needs to be cooked to 160 degrees. A few years ago, we discovered this technique by J. Kenji Alt in Cook’s Illustrated magazine and we’ve been using it ever since always with stellar results. You can now find Kenji at SeriousEats.com.
Perfectly Moist Roast Turkey with Crispy Skin
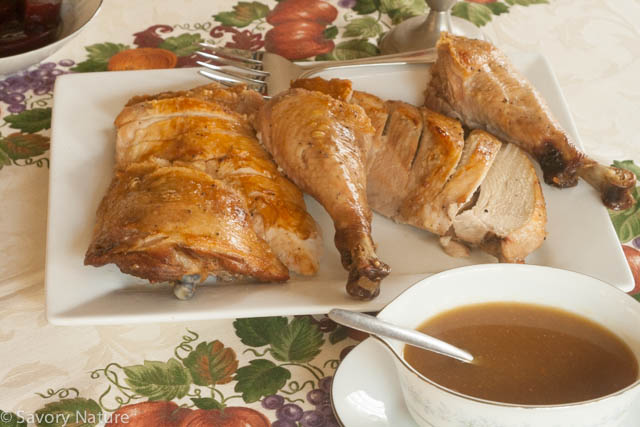
In this recipe, he roasts the turkey in parts. Without the rest of the turkey shielding the thighs from the heat of the oven, you get perfectly done dark meat at 170 – 175 degrees in the thickest part of the thigh at the same time the breast just reaches 160 degrees and is still nice and moist. He does a low temperature roast, which prevents the outer layer of meat from becoming dry and overdone by the time the middle is cooked. And since the turkey is in parts, it cooks just as quickly as the whole bird would at a higher temperature. He lets the roast turkey rest and then crisps up the skin at 500 degrees for 15 minutes before serving.
Why Not Roast Your Turkey in Parts?
I know what you’re thinking, no pretty whole browned roast turkey coming out the oven, just a breast and two leg quarters? But seriously who has the guts to carve at the table? It would make a mess and has lots of embarrassment potential! So you’re not going to be presenting that whole roast turkey anyway. You’ll most likely carve it in the kitchen and present it sliced. So why not roast it in parts and have perfectly moist tender meat all the way through?
Buy a Whole Turkey or Breast and Legs or Even Just a Breast.
There’s the option to buy a turkey breast and turkey leg quarters or drumsticks and thighs. Or if you only like white meat, buy just a breast. Or you can buy a whole turkey and cut it up, which is what we do. I really shouldn’t say we – my husband does the butchering and truth be told, cooks the turkey, too! Lucky me! I’m responsible for sides and gravy. And supervision, of course!
Cutting up a Whole Turkey
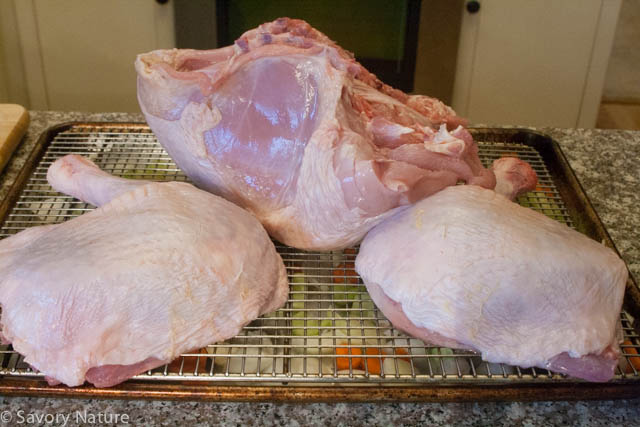
So here is my husband’s explanation of how to cut up the turkey. Remove wings by cutting through meat near breast and inserting the tip of a boning knife into the joint. Twist slightly to pop the wing out and cut off anything holding it to the turkey. Remove legs in much the same manner. Cut down between the thigh and the breast and pull the leg away from the breast until you can see the joint. Insert the tip of the knife and twist to pop the bones apart. Cut the legs free and place on the rack skin side up. Turn the bird over so the breast side is down. Using a boning knife or kitchen shears, remove the backbone of the bird, leaving the whole breast. Save the wings and back for stock (along with giblets and neck, if desired.)
Brown and Delicious Gluten Free Gravy
To make a flavorful gravy, the turkey roasts on a rack on top of onion, celery, carrots, thyme and garlic. The combination of the turkey drippings and the juices from the roasted vegetables makes a really tasty gravy base. I use a fat separator to remove the excess fat from the gravy base before I start to thicken it. Add some extra chicken stock or your own homemade turkey/giblet stock. I’ve adapted the gravy to be gluten free by thickening with cornstarch or potato starch. The result is lovely glossy brown gravy with deep rich taste.
- Vegetables roast with the turkey to create a flavorful gravy.
- Pour off the little bit of fat at the top of the spout and then pour the brown stock into the saucepan until just before the top fat layer reaches into the spout.
- For the turkey:
- One 13-15 pound turkey or a bone-in turkey breast plus leg quarters or drumsticks and thighs (You can also do just a breast but of course it will give you less servings.)
- 3 onions, chopped (save skins and ends for stock)
- 3 celery stalks, chopped
- 2 carrots, peeled and chopped (save peels for stock)
- 1 tsp dried thyme
- 5 garlic cloves, peeled and halved (save peels for stock)
- 1 cup low-sodium chicken broth
- 3 Tbsp margarine (or butter), melted
- 1 Tbsp salt
- 2 tsp freshly ground black pepper
- To make your own turkey stock:
- Wings, back, giblets and neck from turkey
- Onion skins, carrot and garlic peels from above
- 1 onion, quartered (leave skin and ends on – this helps color the stock)
- 2 carrots, roughly chopped
- 2 celery stalks, roughly chopped
- 1 tsp salt
- 5 peppercorns
- 1 bay leaf
- For the gravy:
- 2 cups low-sodium chicken broth or your own turkey broth
- 2 Tbsp cornstarch or potato starch (I personally like the consistency of the gravy best with the cornstarch but either one will work well)
- salt and pepper to taste
- Preheat oven to 275 degrees F
- If you are starting with a whole turkey remove wings by cutting through meat near breast and inserting the tip of a boning knife into the joint.
- Twist slightly to pop the wing out and cut off anything holding it to the turkey.
- Remove legs in much the same manner. Cut down between the thigh and the breast and pull the leg away from the breast until you can see the joint. Insert the tip of the knife and twist to pop the bones apart.
- Cut the legs free and place on the rack skin side up.
- Remove any excess fat from the breast.
- Turn the bird over so the breast side is down.
- Using a boning knife or kitchen shears, remove the backbone of the bird, leaving the whole breast.
- Save the wings and back for stock (along with giblets and neck, if desired.)
- Spread chopped onion, celery and carrots and thyme and garlic over a sheet pan.
- Place a wire rack over the vegetables.
- Brush turkey pieces all over with melted margarine.
- Sprinkle with salt and pepper.
- Put breast skin-side down and leg quarters or drumsticks and thighs skin-side up on rack with space between the pieces.
- Roast turkey 1 hour at 275 degrees. (Meanwhile if you’re making stock start it now according to the directions below.)
- After the turkey has roasted 1 hour, use wads of paper towels to lift the breast and turn it over so it is skin-side up.
- Roast 1-2 hours longer until an instant read thermometer inserted into thickest part of breast reads 160 degrees F and inserted into thickest part of thighs reads 170-175 degrees F.
- Remove from oven, transfer turkey to another baking sheet and allow it to rest for a half hour to an hour.
- Put the turkey wings, neck, back and giblets in a large pot and cover them by an inch or two with water.
- Add the rest of the stock ingredients, onion skins through bay leaf.
- Bring to a boil.
- Reduce heat, cover and simmer 1-2 hours.
- Pour the stock through a colander into a large bowl or pot to strain.
- After turkey is removed from pan, remove rack and scrape contents of pan into a colander set in a large bowl.
- Press the vegetables with the back of a large spoon to extract all their juices into the gravy base and then discard vegetables.
- Pour gravy base into a fat separator and pour lower liquid into a 2-quart saucepan leaving the upper layer of fat behind to discard. If you don’t have a fat separator you can pour the gravy base into a clear measuring cup and ladle off as much of the fat layer on top as possible.
- Add 2 cups of chicken stock or your homemade turkey stock to the saucepan with the gravy base. If you’ve made your own stock I suggest running it through a fat separator too to remove the fat.
- Bring the gravy to a low boil.
- Mix 2 Tbsp cornstarch or potato starch with 2 Tbsp water in a small bowl. Stir it around until the starch is suspended and then add it to the gravy, stirring it in.
- Simmer the gravy for 15 – 20 minutes until it has reduced and thickened.
- Season with salt and pepper to taste and keep warm.
- Reheat if necessary before serving.
- If necessary more stock can be added if it gets too thick or more starch and water if it is too thin. If more starch is added it will need to simmer some more to thicken.
- Preheat the oven to 500 degrees F.
- Place baking sheet with turkey in oven and roast about 15 minutes until skin is crisp and golden brown.
- Remove turkey to a cutting board and let rest 15 minutes.
- Carve and serve.


Leave a Reply